
First, a small disclaimer. This tutorial assumes that you are already familiar with the concepts of vlsi designs, such as netlist, layout, instances and hierarchical design.
This tutorial is aimed at two goals :
While this tutorial is aimed at presenting the Hurricane database, do not feel limited by it. You can use Hurricane objects as attributes of Python objects or use Python containers to store them. The only limitation is that you may not use Hurricane classes as base classes in Python.
All the example scripts given in this tutorial con be found under:
<CORIOLIS_INSTALL>/share/doc/coriolis2/examples/scripts/
Provided scripts:
| Script | Feature |
|---|---|
| coriolisLogo.py | Draw a layout of the Coriolis logo |
| diagonals.py | Test the Hurricane::Diagonal class |
| polygons.py | Test the Hurricane::Polygon class |
| rectilinear.py | Test the Hurricane::rectilinear class |
| invertor.py | Procedural build of the layout of an invertor standard cell |
| fulladder.py | Procedural build of a small netlist along with it's manual placement and the routing of one net ("a") |
| toolengines.py | Build the netlist (only) of the full adder then call the place and route engines |
In the Hurricane database, the logical (netlist) and physical (layout) views are fused. As the main goal of the database is to support place & route tools, we usually starts with a pure netlist which is progessively enriched to become a layout. Cell, in particular, is able to be in any intermediate state. Many of our objects have self-explanatory names, but some don't. Thus we summarize below the more important ones:
| Class | Meaning |
|---|---|
| Cell | The model. A Cell does not have terminals, only nets flagged as external |
| Instance | An instance of a model |
| Net | A grouping of electrically connected components |
| Plug | A terminal of an instance |
| RoutingPad | A physical connexion (pin) to an instance |
The C++ API has been exported in Python as closely as possible. Meaning that, save for a slight change in syntax, any code written in Python could be easily transformed into C++ code. There is no specific documentation written for the Python interface, you may directly use the C++ one.
Mostly:
In hurricane/Net.h header we have:
namespace Hurricane {

   class Net : public Entity {
     public:
       class Direction {
         public: enum Code { DirIn        = 0x0001
                           , DirOut       = 0x0002
                           , DirUndefined = 0x0000
                           , ConnTristate = 0x0100
                           , ConnWiredOr  = 0x0200
                           , UNDEFINED    = DirUndefined
                           , IN           = DirIn
                           , OUT          =         DirOut
                           , INOUT        = DirIn | DirOut
                           , TRISTATE     =         DirOut | ConnTristate
                           , TRANSCV      = DirIn | DirOut | ConnTristate
                           , WOR_OUT      =         DirOut | ConnWiredOr
                           , WOR_INOUT    = DirIn | DirOut | ConnWiredOr
                           , DirMask      = DirIn | DirOut | DirUndefined
                           };
         // [The rest of Class Direction]
      };
     public:
       static       Net*       create       ( Cell* , const Name& );
                    bool       isGlobal     ();
                    bool       isExternal   ();
              const Direction& getDirection ();
                    void       setName      ( Name );
                    void       setGlobal    ( bool );
                    void       setExternal  ( bool );
                    void       setDirection ( const Direction& );
       // [The rest of Class Net]
   };

}
So we can use it the following way in C++:
#include "hurricane/Net.h"

using namespace Hurricane;

void  addNetToCell ( Cell* cell )
{
   Net* net = Net::create( cell, "new_net" );
   net->setGlobal   ( false );
   net->setExternal ( true );
   net->setDirection( Net.Direction.IN );
   cout << "Created " << net << endl;
   return net;
}
The equivalent Python code will be:
from Hurricane import Net

def addNetToCell ( cell ):
    net = Net.create( cell, "new_net" )
    net.setGlobal  ( False )
    net.setExternal( True )
    net.setDirection( Net.Direction.IN )
    print( "Created", net )
    return net
Regarding the memory allocation, the Hurricane database contains two kind of objects.
Objects that are linked to others in the database and whose creation or deletion implies coherency operations. This is the case for Net or Horizontal. They must be created using the static create() method of their class and destroyed with their destroy() method.
And, of course, they cannot be copied (the copy constructor has been disabled).
net = Net.create( cell, 'tmp' )  # Call the static Net.create() function.
                                 # Work with this net.
                                 # ...
net.destroy()                    # Call the dynamic destroy() method.
Objects that are standalone, like Point or Box, uses the usual construction methods. They also use the Python garbage collector mechanism and do not need to be explicitly deleted.
from Hurricane import DbU, Box

def myfunc():
    bb = Box( DbU.fromLambda( 0.0)
            , DbU.fromLambda( 0.0)
            , DbU.fromLambda(15.0)
            , DbU.fromLambda(50.0) )
    return                            # bb will be freed at that point.
Hurricane Collection behave like containers under Python and provide support for the iterator protocol.
from Hurricane import Net, Horizontal

def delAllHorizontals ( net ):
    horizontals = []
    for component in net.getComponents():
        if isinstance(component,Horizontal):
            horizontals.append( component )
    # Now we can remove the Horizontals.
    for horizontal in horizontals:
        horizontal.destroy()
Note
Never remove an element from a Collection_ while iterating over it. You must save the to be removed elements in an auxiliary container then remove them, like shown in the example above
When writing algorithms directly in Python, it may come in handy to be able to add attributes over the Hurricane data-base objects. As C++ objects exposed to the Python realm cannot natively do so (it would means to be able to modify a C++ aobject attributes at runtime), we add a special Property tasked with handling the extra Python attributes. The syntax has been made as simple as possible.
from Hurricane import PythonAttributes

class MyAttribute ( object ):
    count = 0

    def __init__ ( self ):
        self.value = MyAttribute.count
        print( '{} has been created'.format(self) )
        MyAttribute.count += 1

    def __del__ ( self ):
        print( '{} has been deleted'.format(self) )

    def __str__ ( self ):
        return '<MyAttribute {}>'.format(self.value)


def demoAttributes ( cell ):
    PythonAttributes.enable( cell )
    cell.myAttribute0 = MyAttribute()
    cell.myAttribute1 = MyAttribute()
    print( 'cell.myAttribute0 =', cell.myAttribute0 )
    del cell.myAttribute0
    PythonAttributes.disable( cell )
Detailing the life cycle of Python attributes on a DBo:
Enabling the addition of Python attribute on a DBo:
PythonAttributes.enable( cell )
Adding/removing properties on the DBo:
cell.myAttribute0 = MyAttribute()
cell.myAttribute1 = MyAttribute()
print( 'cell.myAttribute0 =', cell.myAttribute0 )
del cell.myAttribute0
And finally disabling the use of Python attributes on the DBo. Any still attached Python attributes will be released.
PythonAttributes.disable( cell )
Note
When the attributes of a DBo are released it does not automatically imply that they are removed. Their reference count is decreased, and if they are only referenced here, they will be deleted. But if other variables still holds reference onto them, they will stay allocateds.
There is no need to keep track of all the DBo that have Python attributes to disable them. One can directly call:
PythonAttributes.disableAll()
Sometimes, the use of a wrapped C++ feature would be counter intuitive regarding the Python feature. For those cases the overlay module provide an adaptation of the C++ API for a more Python-like code. A typical example is with the UpdateSession mechanism.
Using directly the C++ wrapper, we would write a code like this:
from Hurricane import UpdateSession, Net, Vertical
from helpers   import l

def editCell ( cell ):
    UpdateSession.open()
    net = Net.create( cell, "nwell" )
    Vertical.create( net, nwell, l(7.5), l(15.0), l(27.0), l(51.0) )
    # Continued cell's layout building.
    # ...
    UpdateSession.close()
But, using the overlay we got the more pythonic code:
from Hurricane       import Net, Vertical
from helpers         import l
from helpers.overlay import UpdateSession

def editCell ( cell ):
    with UpdateSession():
        net = Net.create( cell, "nwell" )
        Vertical.create( net, nwell, l(7.5), l(15.0), l(27.0), l(51.0) )
        # Continued cell's layout building.
        # ...
To simplify the tedious task of configuring your environment, a helper is provided. It will setup or modify the PATH, LD_LIBRARY_PATH (or DYLD_LIBRARY_PATH under Darwin), PYTHONPATH and CORIOLIS_TOP variables. It should automatically adapt to your kind of shell (Bourne like or C-Shell like).
<CORIOLIS_INSTALL>/etc/coriolis2/coriolisEnv.py
Use it like this (don't forget the eval and the backquotes):
dummy@lepka:~> eval `<CORIOLIS_INSTALL>/etc/coriolis2/coriolisEnv.py`
Note
Do not call that script in your environment initialisation. When used under rhel6 or clones, it needs to be run in the devtoolset environment. The script then launches a new shell, which may cause an infinite loop if it's called again in, say ~/.bashrc.
Instead you may want to create an alias:
alias c2r='eval "`<CORIOLIS_INSTALL>/etc/coriolis2/coriolisEnv.py`"'
You may create, in the directory you are lanching Coriolis tools, a special sub-directory coriolis2/ that can contain the configuration files:
Note
Those two files will by processed by the Python interpreter, so they can contain any code in addition to the mandatory variables.
The attributes name and definitions of cfg are detailed in CGT - The Graphical Interface.
Selecting the Technology
The important line here is:
import symbolic.cmos
This import loads and setup the technology used througout this run of Coriolis. One and only one technology can be loaded in a Coriolis run.
Example of file:
# -*- Mode:Python -*-

import os
import Cfg
import Viewer
import CRL
import symbolic.cmos
from   helpers       import overlay

if 'CELLS_TOP' in os.environ:
    cellsTop = os.environ['CELLS_TOP']
else:
    cellsTop = '../../../cells'

with overlay.CfgCache(priority=Cfg.Parameter.Priority.UserFile) as cfg:
    cfg.misc.catchCore              = False
    cfg.misc.info                   = False
    cfg.misc.paranoid               = False
    cfg.misc.bug                    = False
    cfg.misc.logMode                = True
    cfg.misc.verboseLevel1          = True
    cfg.misc.verboseLevel2          = True
    cfg.misc.minTraceLevel          = 1900
    cfg.misc.maxTraceLevel          = 3000
    cfg.katana.eventsLimit          = 1000000
    cfg.katana.termSatReservedLocal = 6
    cfg.katana.termSatThreshold     = 9
    Viewer.Graphics.setStyle( 'Alliance.Classic [black]' )
    af  = CRL.AllianceFramework.get()
    env = af.getEnvironment()
    env.setCLOCK( '^ck$|m_clock|^clk$' )
    env.addSYSTEM_LIBRARY( library=cellsTop+'/nsxlib', mode=CRL.Environment.Prepend )
    env.addSYSTEM_LIBRARY( library=cellsTop+'/niolib', mode=CRL.Environment.Prepend )
In this part, we will show how to create and save a terminal Cell, that is, a cell without instances (the end point of a hierarchical design). To illustrate the case we will draw the layout of a standard cell.
We will introduce the following classes : Cell, Net, Component and its derived classes.
The Hurricane database only manages objects in memory. To load or save something from the outside, we need to use a framework. As of today, only one is available : the Alliance framework. It allows Coriolis to handle Alliance libraries and cells in the exact same way.
Note
To see how the AllianceFramework is configured for your installation, please have a look to alliance.conf in the etc/coriolis2 directory. It must contains the same settings as the various MBK_ variables used for Alliance.
In the Hurricane database, all modifications must take place inside an UpdateSession. At the closing of a session, created or modificated objects are fully inserted in the database. This is especially true for the visualisation, a created component will be visible only only after the session close.
Note
See QuadTree and Query.
The creation of a new Cell occurs through the AllianceFramework, and, as stated above, inside a UpdateSession. The AllianceFramework environment is provided by the crl module.
from Hurricane import *
from CRL       import *
from helpers.overlay import UpdateSession

af = AllianceFramework.get()
with UpdateSession():
    cell = af.createCell( 'my_inv' )
    # Build then save the Cell.
This is the simplest call to createCell(), and in that case, the newly created Cell will be saved in the working library (usually, the current directory). You may supply a second argument telling into which library you want the Cell to be created.
In the Hurricane Cell object, there is no concept of view, it contains completly fused logical (netlist) and physical (layout) views.
All coordinates in the Hurricane database are expressed in DbU (for Database Unit) which are integer numbers of foundry grid. To be more precise, they are fixed points numbers expressed in hundredth of foundry grid (to allow transient non-integer computation).
To work with symbolic layout, that is, using lambda based lengths, two conversion functions are provided:
In the weakly typed Python world, lbd is float while unit is integer.
In order to reduce the number of characters one has to code, the helpers module provides three very short function to perform conversion towards DbU :
def l ( value ):
    """Convert a lambda into a DbU."""
    return DbU.fromLambda( value )

def u ( value ):
    """Convert a length in micrometer into a DbU."""
    return DbU.fromPhysical( value, Hurricane.DbU.UnitPowerMicro )

def n ( value ):
    """Convert a length in nanometer into a DbU."""
    return DbU.fromPhysical( value, Hurricane.DbU.UnitPowerNano  )
To setup the abutment box, we use a Box which defines a box from the coordinates of the lower left corner (x1,y1) and upper left corner (x2,y2).
b = Box( l( 0.0)    # x1
       , l( 0.0)    # y1
       , l(15.0)    # x2
       , l(50.0) )  # y2
cell.setAbutmentBox( b )
Or more simply:
cell.setAbutmentBox( Box( l( 0.0), l( 0.0), l(15.0), l(50.0) ) )
In the Hurricane terminology, a component is any kind of physical object among:
Components cannot be created alone. They must be part of a Net.
As physical elements, Components are created using a Layer. So prior to their creation, we must get one from the database. Layers are stored in the Technology, which in turn, is stored in the DataBase. So, to get a Layer:
layer = DataBase.getDB().getTechnology().getLayer( 'METAL1' )
Note
Convention for layer names. As the database can manage both real layers and symbolic ones we adopt the following convention:
As said above, prior to creating any Component, we must create the Net it will belong to. In that example we also make it an external net, that is, a part of the interface. Do not mistake the name of the net given as a string argument 'i' and the name of the variable i holding the Net object. For the sake of clarity we try to give the variable a close name, but this is not mandatory.
i = Net.create( cell, 'i' )
i.setExternal( True )
Note
Unlike some other database models, in Hurricane, there is no explicit terminal object, you only need to make the net external. For more information about how to connect to an external net, see 6.2 Creating Nets and connecting to Instances.
Finally, we get ready to create a Component, we will make a Vertical segment of METAL1.
segment = Vertical.create( i            # The owner Net.
                         , layer        # The layer.
                         , l(  5.0 )    # The X coordinate.
                         , l(  2.0 )    # The width.
                         , l( 10.0 )    # The Y source coordinate.
                         , l( 40.0 ) )  # The Y target coordinate.
With this overload of the Vertical.create() function the segment is created at an absolute position. There is a second overload for creating a relatively placed segment, see articulated layout.
If the net is external, that is, part of the interface of the cell, you may have to declare some of its components as physical connectors usable by the router. This is done by calling the NetExternalComponents class:
NetExternalComponents.setExternal( segment )
Once you have finished to build your cell, you have to save it on disk. Using the AllianceFramework you can save it as a pair of file:
| View | Flag | File extension |
|---|---|---|
| Logical / Netlist | Catalog.State.Logical | .vst |
| Physical / Layout | Catalog.State.Physical | .ap |
To save both views, use the Catalog.State.Views flag. The files will be written in the Alliance WORK_DIR.
af.saveCell( cell, Catalog.State.Views )
The example files can be found in the share/doc/coriolis2/examples/scripts/ directory (under the the root of the Coriolis installation).
The code needed to run it through the cgt viewer has been added. For the explanation of that part of the code, refer to 5. Make a script runnable through cgt.
#!/usr/bin/python

import sys
from   Hurricane import DataBase, NetExternalComponents, Net, \
                        DbU, Point, Box, Horizontal, Vertical, Contact, RoutingPad, \
                        Breakpoint
from   CRL       import AllianceFramework, Catalog
from   helpers   import l
from   helpers.overlay import UpdateSession


def doBreak ( level, message ):
    """Put a breakpoint into the script."""
    Breakpoint.stop( level, message )


def buildInvertor ( editor ):
    """Build step by step an invertor standard cell."""
    with UpdateSession():
        cell = AllianceFramework.get().createCell( 'invertor' )
        cell.setTerminalNetlist( True )
        cell.setAbutmentBox( Box( l(0.0), l(0.0), l(15.0), l(50.0) ) )

    if editor:
      editor.setCell( cell )
      editor.fit()

    with UpdateSession():
        technology = DataBase.getDB().getTechnology()
        metal1     = technology.getLayer( "METAL1"     )
        poly       = technology.getLayer( "POLY"       )
        ptrans     = technology.getLayer( "PTRANS"     )
        ntrans     = technology.getLayer( "NTRANS"     )
        pdif       = technology.getLayer( "PDIF"       )
        ndif       = technology.getLayer( "NDIF"       )
        contdifn   = technology.getLayer( "CONT_DIF_N" )
        contdifp   = technology.getLayer( "CONT_DIF_P" )
        nwell      = technology.getLayer( "NWELL"      )
        contpoly   = technology.getLayer( "CONT_POLY"  )
        ntie       = technology.getLayer( "NTIE"       )

        net = Net.create( cell, "nwell" )
        Vertical.create( net, nwell, l(7.5), l(15.0), l(27.0), l(51.0) )

        vdd = Net.create( cell, "vdd" )
        vdd.setExternal( True )
        vdd.setGlobal  ( True )
        h = Horizontal.create(vdd, metal1, l(47.0), l(6.0), l(0.0), l(15.0) )
        NetExternalComponents.setExternal( h )
        Contact.create ( vdd, contdifn, l(10.0), l(47.0), l( 1.0), l( 1.0) )
        Contact.create ( vdd, contdifp, l( 4.0), l(45.0), l( 1.0), l( 1.0) )
        Vertical.create( vdd, pdif    , l( 3.5), l( 4.0), l(28.0), l(46.0) )
        Vertical.create( vdd, ntie    , l(10.0), l( 3.0), l(43.0), l(48.0) )
    doBreak( 1, 'Done building vdd.' )

    with UpdateSession():
        vss = Net.create( cell, "vss" )
        vss.setExternal( True )
        vss.setGlobal  ( True )
        h = Horizontal.create(vss, metal1, l(3.0), l(6.0), l(0.0), l(15.0))
        NetExternalComponents.setExternal( h )
        Vertical.create( vss, ndif    , l(3.5), l(4.0), l(4.0), l(12.0) )
        Contact.create ( vss, contdifn, l(4.0), l(5.0), l(1.0), l( 1.0) )
    doBreak( 1, 'Done building vss.' )

    with UpdateSession():
        i = Net.create( cell, "i" )
        i.setExternal( True )
        v = Vertical.create ( i, metal1, l(5.0), l(2.0), l(10.0), l(40.0) )
        NetExternalComponents.setExternal( v )
        Vertical.create  ( i, ptrans  , l( 7.0), l( 1.0), l(26.0), l(39.0) )
        Vertical.create  ( i, ntrans  , l( 7.0), l( 1.0), l( 6.0), l(14.0) )
        Vertical.create  ( i, poly    , l( 7.0), l( 1.0), l(14.0), l(26.0) )
        Horizontal.create( i, poly    , l(20.0), l( 3.0), l( 4.0), l( 7.0) )
        Contact.create   ( i, contpoly, l( 5.0), l(20.0), l( 1.0), l( 1.0) )
    doBreak( 1, 'Done building i.' )

    with UpdateSession():
        nq = Net.create ( cell, "nq" )
        nq.setExternal( True )
        v = Vertical.create( nq, metal1, l(10.0), l(2.0), l(10.0), l(40.0) )
        NetExternalComponents.setExternal( v )
        Vertical.create( nq, pdif    , l(10.0), l( 3.0), l(28.0), l(37.0) )
        Vertical.create( nq, ndif    , l(10.0), l( 3.0), l( 8.0), l(12.0) )
        Contact.create ( nq, contdifp, l(10.0), l(35.0), l( 1.0), l( 1.0) )
        Contact.create ( nq, contdifp, l(10.0), l(30.5), l( 1.0), l( 1.0) )
        Contact.create ( nq, contdifn, l(10.0), l(10.0), l( 1.0), l( 1.0) )
    doBreak( 1, 'Done building q.' )

    AllianceFramework.get().saveCell( cell, Catalog.State.Views )


def scriptMain ( **kw ):
    """The Mandatory function to be run by Coriolis interactively."""
    editor = None
    if 'editor' in kw and kw['editor']:
        editor = kw['editor']
    buildInvertor( editor )
    return True
In this part, we will show how to navigate through the Nets and Components of a Cell.
In Hurricane all kind of set of objects, whether organized in a real container like a map<> (dictionary / dict) or a vector<> (table / list) or an algorithmic walkthrough of the database can be accessed through a Collection.
C++ Collections objects are exposed in Python through the iterable protocol, allowing to simply write:
for net in cell.getNets():
    print( 'Components of', net )
    for component in net.getComponents():
        print( '|', component )
In C++ we would have been written:
for ( Net* net : cell->getNets() ) {
  cout << "Components of " << net << endl;
  for ( Component* component : net->getComponents() ) {
    cout << "| " << component << endl,
  }
}
Never delete or create an element while you are iterating over a Collection.
Results can be unpredictable, you may just end up with a core dump, but more subtly, some element of the Collection may be skipped or processed twice. If you want to create or delete an element, do it outside the collection loop. For example:
cellNets = []
for net in cell.getNets():
    cellNets.append( net )

# Remove all the anonymous nets.
for net in cellNets:
    if net.getName().endswith('nymous_'):
        print( 'Destroy', net )
        net.destroy()
As presented in 2.1 The Alliance Framework, the Cell that will be returned by the getCell() call wil be:
If a Cell of that name is already loaded into memory, it will be returned.
Note
It means that it shadows any modifications that could have been on disk since it was first loaded. Conversely, if the Cell has been modified in memory, you will get those modifications.
Search, in the ordered list of libraries, the first Cell that matches the requested name.
Note
It means that if cells with the same name exist in different libraries, only the one in the first library will be ever used. Be also aware that cell files that may remain in the WORK_LIB, may unexpectedly shadow cells from the libraries.
cell = af.getCell( 'inv_x1', Catalog.State.Views )
To use your script you may run it directly like any other Python script. But, for debugging purpose it may be helpful to run it through the interactive layout viewer cgt.
For cgt to be able to run your script, you must add to your script file a function named scriptMain(), which takes a dictionary as sole argument (**kw). The kw dictionary contains, in particular, the CellViewer object we are running under with the keyword editor. You can then load your cell into the viewer using the menu:
Note
If you use breakpoints and want to see the progress of your script in the viewer, do not use the --script option of cgt.
ego@home:~> cgt -V --script=invertor
Because the script is run before the viewer is launched, you will only see the end result of your script.
def buildInvertor ( editor ):
    """Build step by step an invertor standard cell."""
    with UpdateSession():
        cell = AllianceFramework.get().createCell( 'invertor' )
        cell.setTerminalNetlist( True )

        cell.setAbutmentBox( Box( l(0.0), l(0.0), l(15.0), l(50.0) ) )
    if editor:
        editor.setCell( cell )
        editor.fit()

    # The rest of the script...
    return


def scriptMain ( **kw ):
    """The Mandatory function to be run by Coriolis interactively."""
    editor = None
    if 'editor' in kw and kw['editor']:
        editor = kw['editor']
    buildInvertor( editor )
    return True
It is possible to add breakpoints inside a script by calling the Breakpoint.stop() function. To be able to see exactly what has just been modified, be sure to have closed any UpdateSession before calling breakpoints. The Breakpoint.stop() function takes two arguments:
We can create a little function to ease the work:
def doBreak ( level, message ):
    Breakpoint.stop( level, message )
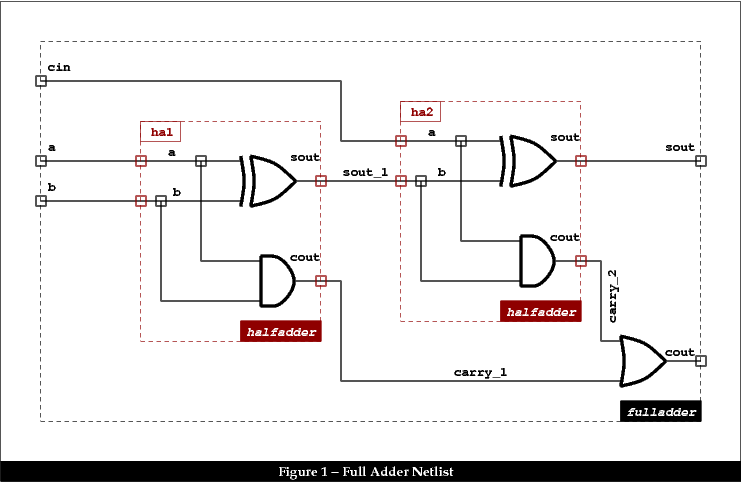
To illustrate the topic, we will build the netlist of a fulladder from standard cell.
Creating an Instance is straigthforward, the constructor needs only three parameters:
Note
Do not confuse the cell the instance is create into (fulladder) and the cells it refers to (the master cell xr2_x2).
af     = AllianceFramework.get()
xr2_x2 = af.getCell( 'xr2_x1', Catalog.State.Views )

fulladder = af.createCell( 'fulladder' )
xr2_1     = Instance.create( fulladder, 'xr2_1', xr2_x2 )
An Instance has one Plug for each external net of the master cell. The plug allows to create a logical connection bewteen a Net of fulladder and a net from an Instance master cell.
A plug is somewhat equivalent to an instance terminal in other well known databases.
Therefore, a plug is related to two nets:
To find the plug of an instance associated to a given net in the master cell, use instance.getPlug( masterNet ). The masterNet argument being an object of class net (not its name).
Building the a net of fulladder:
a = Net.create( fulladder, "a" )
a.setExternal( True )
xr2_1.getPlug( xr2_x2.getNet("i0") ).setNet( a )
a2_1 .getPlug(  a2_x2.getNet("i0") ).setNet( a )
Note
Limitation of Hurricane Netlists. There is no explicit terminal object in the Hurricane database. Plugs are generated on the fly for each external net of the instance. One important consequence is that a net cannot appear on the interface as two differently named terminals (sometimes referred as weekly connected terminals). There is a strict bijection between external nets and plugs.
While it may be restrictive, it enforces cleaner designs and make it possible for the HyperNet concept/class.
For supplies, it may be tedious to connect the Plugs of each cell one by one (and create a lot of unneeded objects). To avoid that, we may use Named connections. If a signal in fulladder is set to global, then it will be considered as connected to any signal with the same name and global in the master cell of the instances.
vdd = Net.create( fulladder, "vdd" )
vdd.setExternal( True )
vdd.setGlobal  ( True )  # Will be connected to all the instances.
Even if loaded in the viewer, an Instance will not be displayed until it is placed.
To place an Instance, we apply a Transformation to the coordinate system of the master cell. A transformation is composed of two operations:
The transformation is a change of coordinate system, be aware that if the abutment box lower left corner of the master cell is not at (0,0) the result of the Transformation may not be what you expect. To simplify the computation of the transformation of an instance, always place the lower left corner of the abutment box at (0,0)
Assuming that we want to place the cells of the fulladder into two rows, that the abutment box lower left corner is at (0,0) (same for the xr2_x2 master cell layout). Here is the code to place the xr2_1 instance to left of the second row.
Setting the translation on an Instance is not enough to make it be displayed, we also must set its placement status to Instance.PlacementStatus.PLACED.
xr2_1.setTransformation( Transformation( l(0.0), l(100.0), Transformation.Orientation.MY ) )
xr2_1.setPlacementStatus( Instance.PlacementStatus.PLACED )
As was stated before, Plugs represent a logical connection between two levels of hierarchy. To make the physical connection to the master net in the instance, we now must create, in the fulladder, a special component which is a kind of reference to a component of the master net (in the master cell).
The so called special component is a RoutingPad.
The RoutingPad can be considered as an equivalent to pin in other well known databases.
rp = RoutingPad.create( a
                      , Occurrence( xr2_1.getPlug( xr2_x2.getNet("i0")) )
                      , RoutingPad.BiggestArea )
For the second parameter, we must pass an Occurrence. Occurrence objects will be explained in detail later, for now, let say that we must construct the Occurrence object with one parameter : the Plug for which we want to create a physical connection.
The RoutingPad rp will be a component of the a net.
The third argument ask the constructor of the RoutingPad to select in the master net, the component which has the biggest area.
Note
Component selection. Not all the components of a net can be selected for connection through a RoutingPad. The candidates must have been flagged with the NetExternalComponents class.
After the creation of the RoutingPads, the wiring is to be created with ordinary layout components (Horizontal, Vertical and Contact possibly articulated). Here is the complete code for net a. We made an articulated layout where contacts are created over RoutingPads then segments over contacts.
# Build wiring for a.
# Create RoutingPads first.
 rp1 = RoutingPad.create( a
                        , Occurrence( xr2_1.getPlug( xr2_x2.getNet("i0")) )
                        , RoutingPad.BiggestArea )
 rp2 = RoutingPad.create( a
                        , Occurrence(  a2_1.getPlug(  a2_x2.getNet("i0")) )
                        , RoutingPad.BiggestArea )

# Then regular wiring.
 contact1 = Contact.create( rp1, via12, l( 0.0), l(-15.0) )
 contact2 = Contact.create( rp2, via12, l( 0.0), l( 10.0) )
 turn     = Contact.create( a  , via23, l(10.0), l( 35.0) )
 Horizontal.create( contact2, turn     , metal2, l(35.0), l(2.0) )
 Vertical  .create( turn    , contact1 , metal3, l(10.0), l(2.0) )
Note
In order to better see the layout of the wiring only, open the Controller and in the Filter tab, uncheck Process Terminal Cells.
The example file fulladder.py can be found in the share/doc/coriolis2/examples/scripts/ directory (under the the root of the Coriolis installation).
#!/usr/bin/python

import sys
from   Hurricane import DataBase, Instance, Box, Net, Horizontal, Vertical, Contact, \
                        RoutingPad, Transformation, Occurrence, \
                        Breakpoint
from   CRL       import AllianceFramework, Catalog, Gds
from   helpers   import l
from   helpers.overlay import UpdateSession


def doBreak ( level, message ):
    """Put a breakpoint into the script."""
    Breakpoint.stop( level, message )


def buildFulladder ( editor ):
    """Build step by step full adder (netlist & placement)."""
    # Get the Framework and all the master cells.
    af     = AllianceFramework.get()
    xr2_x2 = af.getCell( 'xr2_x1', Catalog.State.Views )
    a2_x2  = af.getCell( 'a2_x2' , Catalog.State.Views )
    o2_x2  = af.getCell( 'o2_x2' , Catalog.State.Views )

    with UpdateSession():
        fulladder = af.createCell( 'fulladder' )
        fulladder.setAbutmentBox( Box( l(0.0), l(0.0), l(90.0), l(100.0) ) )

    if editor:
        editor.setCell( fulladder )
        editor.fit()

    with UpdateSession():
        # Create Instances.
        a2_1  = Instance.create( fulladder,  'a2_1',  a2_x2 )
        a2_2  = Instance.create( fulladder,  'a2_2',  a2_x2 )
        xr2_1 = Instance.create( fulladder, 'xr2_1', xr2_x2 )
        xr2_2 = Instance.create( fulladder, 'xr2_2', xr2_x2 )
        o2_1  = Instance.create( fulladder,  'o2_1',  o2_x2 )

        # Create Nets.
        vss = Net.create( fulladder, "vss" )
        vss.setExternal( True )
        vss.setGlobal  ( True )

        vdd = Net.create( fulladder, "vdd" )
        vdd.setExternal( True )
        vdd.setGlobal  ( True )

        cin = Net.create( fulladder, "cin" )
        cin.setExternal( True )
        xr2_2.getPlug( xr2_x2.getNet('i0') ).setNet( cin )
        a2_2 .getPlug(  a2_x2.getNet('i0') ).setNet( cin )

        a = Net.create( fulladder, 'a' )
        a.setExternal( True )
        xr2_1.getPlug( xr2_x2.getNet('i0') ).setNet( a )
        a2_1 .getPlug(  a2_x2.getNet('i0') ).setNet( a )

        b = Net.create( fulladder, 'b' )
        b.setExternal( True )
        xr2_1.getPlug( xr2_x2.getNet('i1') ).setNet( b )
        a2_1 .getPlug(  a2_x2.getNet('i1') ).setNet( b )

        sout_1 = Net.create( fulladder, 'sout_1' )
        xr2_1.getPlug( xr2_x2.getNet('q' ) ).setNet( sout_1 )
        xr2_2.getPlug( xr2_x2.getNet('i1') ).setNet( sout_1 )
        a2_2 .getPlug(  a2_x2.getNet('i1') ).setNet( sout_1 )

        carry_1 = Net.create( fulladder, 'carry_1' )
        a2_1.getPlug( a2_x2.getNet('q' ) ).setNet( carry_1 )
        o2_1.getPlug( o2_x2.getNet('i1') ).setNet( carry_1 )

        carry_2 = Net.create( fulladder, 'carry_2' )
        a2_2.getPlug( a2_x2.getNet('q' ) ).setNet( carry_2 )
        o2_1.getPlug( o2_x2.getNet('i0') ).setNet( carry_2 )

        sout = Net.create( fulladder, 'sout' )
        sout.setExternal( True )
        xr2_2.getPlug( xr2_x2.getNet('q') ).setNet( sout )

        cout = Net.create( fulladder, 'cout' )
        cout.setExternal( True )
        o2_1.getPlug( o2_x2.getNet('q') ).setNet( cout )

    # Instances placement.
    with UpdateSession():
        a2_1.setTransformation( Transformation( l(0.0)
                                              , l(0.0)
                                              , Transformation.Orientation.ID ) )
        a2_1.setPlacementStatus( Instance.PlacementStatus.PLACED )
    doBreak( 1, 'Placed a2_1' )

    with UpdateSession():
        xr2_1.setTransformation( Transformation( l(  0.0)
                                               , l(100.0)
                                               , Transformation.Orientation.MY ) )
        xr2_1.setPlacementStatus( Instance.PlacementStatus.PLACED )
    doBreak( 1, 'Placed xr2_1' )

    with UpdateSession():
        a2_2.setTransformation( Transformation( l(25.0)
                                              , l( 0.0)
                                              , Transformation.Orientation.ID ) )
        a2_2.setPlacementStatus( Instance.PlacementStatus.PLACED )
    doBreak( 1, 'Placed a2_2' )

    with UpdateSession():
        xr2_2.setTransformation( Transformation( l( 45.0)
                                               , l(100.0)
                                               , Transformation.Orientation.MY ) )
        xr2_2.setPlacementStatus( Instance.PlacementStatus.PLACED )
    doBreak( 1, 'Placed xr2_2' )

    with UpdateSession():
        o2_1.setTransformation( Transformation( l(65.0)
                                              , l( 0.0)
                                              , Transformation.Orientation.ID ) )
        o2_1.setPlacementStatus( Instance.PlacementStatus.PLACED )
    doBreak( 1, 'Placed o2_1' )

    # Add filler cells.
    with UpdateSession():
        tie_x0    = af.getCell(    'tie_x0', Catalog.State.Views )
        rowend_x0 = af.getCell( 'rowend_x0', Catalog.State.Views )
        filler_1  = Instance.create( fulladder, 'filler_1',    tie_x0 )
        filler_2  = Instance.create( fulladder, 'filler_2', rowend_x0 )

        filler_1.setTransformation( Transformation( l(50.0)
                                                  , l( 0.0)
                                                  , Transformation.Orientation.ID ) )
        filler_1.setPlacementStatus( Instance.PlacementStatus.PLACED )

        filler_2.setTransformation( Transformation( l(60.0)
                                                  , l( 0.0)
                                                  , Transformation.Orientation.ID ) )
        filler_2.setPlacementStatus( Instance.PlacementStatus.PLACED )
    doBreak( 1, 'Filler cell placeds' )

   # Getting the layers.
    technology = DataBase.getDB().getTechnology()
    metal2     = technology.getLayer( "METAL2" )
    metal3     = technology.getLayer( "METAL3" )
    via12      = technology.getLayer( "VIA12"  )
    via23      = technology.getLayer( "VIA23"  )

    with UpdateSession():
        # Build wiring for a.
        # Create RoutingPads first.
        rp1 = RoutingPad.create( a
                               , Occurrence( xr2_1.getPlug( xr2_x2.getNet("i0")) )
                               , RoutingPad.BiggestArea )
        rp2 = RoutingPad.create( a
                               , Occurrence(  a2_1.getPlug(  a2_x2.getNet("i0")) )
                               , RoutingPad.BiggestArea )

        # Then regular wiring.
        contact1 = Contact.create( rp1, via12, l( 0.0), l(-15.0) )
        contact2 = Contact.create( rp2, via12, l( 0.0), l( 10.0) )
        turn     = Contact.create( a  , via23, l(10.0), l( 35.0) )
        Horizontal.create( contact2, turn     , metal2, l(35.0), l(2.0) )
        Vertical  .create( turn    , contact1 , metal3, l(10.0), l(2.0) )

    af.saveCell( fulladder, Catalog.State.Views )


def scriptMain ( **kw ):
    """The Mandatory function to be run by Coriolis interactively."""
    editor = None
    if 'editor' in kw and kw['editor']:
        editor = kw['editor']
    buildFulladder( editor )
    return True
The AllianceFramework only manages symbolic layout as Alliance does. But Coriolis is also able to work directly in real mode, meaning that distances will be expressed in microns instead of lambdas.
The real mode will be illustrated by working with the FreePDK45.
We will assume that the FreePDK45 archives is installed under:
/home/dks/
Importing a lef file is simple, you just call the static function LefImport.load(). Multiple lef file can be imported one after another.
# You must set "DKsdir" to where you did install the NCSU FreePDK 45nm DK.
DKsdir  = '/home/dks'

library = LefImport.load( DKsdir + '/FreePDK45/osu_soc/lib/files/gscl45nm.lef' )
Note
Technology checking. The first imported lef file must contain the technology. The technology described in the lef file will be checked against the one configured in the running instance of Coriolis to look for any discrepencies.
The blif format is generated by the Yosys logic synthetizer. Here again, it is pretty straightforward: call the static function Blif.load(). If you made your synthesis on a cell library not managed by AllianceFramework, for example the one of the FreePDK45, you must load it prior to calling the blif loader.
cell = Blif.load( 'snx' ) # load "snx.blif" in the working directory.
The ToolEngine class is the base class for all tools developped in Coriolis. In the rest of the tutorial we will use the names tool or engine as synonyms.
To run the placer, create the Etesian engine, then call the place() function.
import Etesian

# [...]

etesian = Etesian.EtesianEngine.create(cell)
etesian.place()
You can configure the placer in two ways:
Prior to the creation of the engine, setup an abutment for the cell. The placer will fit the cells into that area. If the area is too small, it will issue an error.
Setup Etesian parameters through the settings.py configuration file. For example:
with overlay.CfgCache(priority=Cfg.Parameter.Priority.UserFile) as cfg:
    cfg.etesian.effort           = 2
    cfg.etesian.spaceMargin      = 0.8
    cfg.etesian.densityVariation = 0.1
    cfg.etesian.aspectRatio      = 1.0
With this setup, the placement will have 80% of free space added and an aspect ratio of 100% (square shape). Some variations in density is allowed, with at most 10% unused space.
Like for Etesian, you have to create the engine on the cell then call the sequence of functions detailed below.
Note
Kite vs. Katana. There are currently two routers in Coriolis, Kite is the old one and digital only. Katana is a re-implementation with support for mixed routing (digital and analog). Until Katana is fully implemented we keep both of them.
import Anabatic
import Katana

# [...]

katana = Katana.KatanaEngine.create(cell)
katana.digitalInit      ()
katana.runGlobalRouter  ()
katana.loadGlobalRouting( Anabatic.EngineLoadGrByNet )
katana.layerAssign      ( Anabatic.EngineNoNetLayerAssign )
katana.runNegociate     ( Katana.Flags.NoFlags )
The example file toolengines.py can be found in the share/doc/coriolis2/examples/scripts/ directory (under the the root of the Coriolis installation).
This script automatically places and routes the fulladder netlist as seen previously. The call to the ToolEngines is made inside the new function placeAndRoute().
Note
As the ToolEngine take care of opening and closing UpdateSession, we do not need the wrapper function doBreak() around the breakpoints. We directly call Breakpoint.
Note
The space margin for this example is very high (80%), it's only because it's too small for the placer to run correctly. For normal case it is around 3%.
#!/usr/bin/python

import sys
from   Hurricane import *
from   CRL       import *
import Etesian
import Anabatic
import Katana

# Everybody needs it.
af = AllianceFramework.get()

def buildFulladder ( editor ):
    # Get the Framework and all the master cells.
    xr2_x2 = af.getCell( 'xr2_x1', Catalog.State.Views )
    a2_x2  = af.getCell( 'a2_x2' , Catalog.State.Views )
    o2_x2  = af.getCell( 'o2_x2' , Catalog.State.Views )

    with UpdateSession():
        fulladder = af.createCell( 'fulladder' )

        # Create Instances.
        a2_1  = Instance.create( fulladder,  'a2_1',  a2_x2 )
        a2_2  = Instance.create( fulladder,  'a2_2',  a2_x2 )
        xr2_1 = Instance.create( fulladder, 'xr2_1', xr2_x2 )
        xr2_2 = Instance.create( fulladder, 'xr2_2', xr2_x2 )
        o2_1  = Instance.create( fulladder,  'o2_1',  o2_x2 )

        # Create Nets.
        vss = Net.create( fulladder, "vss" )
        vss.setExternal( True )
        vss.setGlobal  ( True )

        vdd = Net.create( fulladder, "vdd" )
        vdd.setExternal( True )
        vdd.setGlobal  ( True )

        cin = Net.create( fulladder, "cin" )
        cin.setExternal( True )
        xr2_2.getPlug( xr2_x2.getNet('i0') ).setNet( cin )
        a2_2 .getPlug(  a2_x2.getNet('i0') ).setNet( cin )

        a = Net.create( fulladder, 'a' )
        a.setExternal( True )
        xr2_1.getPlug( xr2_x2.getNet('i0') ).setNet( a )
        a2_1 .getPlug(  a2_x2.getNet('i0') ).setNet( a )

        b = Net.create( fulladder, 'b' )
        b.setExternal( True )
        xr2_1.getPlug( xr2_x2.getNet('i1') ).setNet( b )
        a2_1 .getPlug(  a2_x2.getNet('i1') ).setNet( b )

        sout_1 = Net.create( fulladder, 'sout_1' )
        xr2_1.getPlug( xr2_x2.getNet('q' ) ).setNet( sout_1 )
        xr2_2.getPlug( xr2_x2.getNet('i1') ).setNet( sout_1 )
        a2_2 .getPlug(  a2_x2.getNet('i1') ).setNet( sout_1 )

        carry_1 = Net.create( fulladder, 'carry_1' )
        a2_1.getPlug( a2_x2.getNet('q' ) ).setNet( carry_1 )
        o2_1.getPlug( o2_x2.getNet('i1') ).setNet( carry_1 )

        carry_2 = Net.create( fulladder, 'carry_2' )
        a2_2.getPlug( a2_x2.getNet('q' ) ).setNet( carry_2 )
        o2_1.getPlug( o2_x2.getNet('i0') ).setNet( carry_2 )

        sout = Net.create( fulladder, 'sout' )
        sout.setExternal( True )
        xr2_2.getPlug( xr2_x2.getNet('q') ).setNet( sout )

        cout = Net.create( fulladder, 'cout' )
        cout.setExternal( True )
        o2_1.getPlug( o2_x2.getNet('q') ).setNet( cout )

    af.saveCell( fulladder, Catalog.State.Views )
    return fulladder


def placeAndRoute ( editor, cell ):
    # Run the placer.
    etesian = Etesian.EtesianEngine.create(cell)
    etesian.place()
    if editor:
        editor.setCell( cell )
        editor.fit()

    Breakpoint.stop( 1, 'After placement' )

    # Run the router.
    katana = Katana.KatanaEngine.create(cell)
    katana.digitalInit      ()
    katana.runGlobalRouter  ()
    katana.loadGlobalRouting( Anabatic.EngineLoadGrByNet )
    katana.layerAssign      ( Anabatic.EngineNoNetLayerAssign )
    katana.runNegociate     ( Katana.Flags.NoFlags )

    af.saveCell( cell, Catalog.State.Views )


def scriptMain ( **kw ):
    editor = None
    if 'editor' in kw and kw['editor']:
        editor = kw['editor']
    fulladder = buildFulladder( editor )
    placeAndRoute( editor, fulladder )
    return True
This is a place holder as well as a reminder to myself to write this part of the documentation.
The trans-hierarchical workhorse.
Unlike the Plugs that only make connections between two adjacent hierarchical levels, RoutingPads can refer to a deeply buried terminal.
This class is part of the virtual flattening mechanism, it allows to go through all the components of a trans-hierarchical net.
For a starter, how to get all the leaf cells...